Objects to
begin with
As a beginner, you should
concentrate on objects that are easy to obtain, possess a large variety of shapes
and can be studied without micro-technical treatment. Therefore, the best object
to start with is plankton. But it is
not sufficient to simply put a drop of pond water under the microscope, because
the plankton concentration there is too low. You need a plankton net, which
can be optionally mounted on a pole or connected to a braided nylon cord in
order to take samples from bridges or piers. The samples are stored in small
glasses, but they must not be filled completely: make sure that a certain amount
of air remains in the glass. These glasses should be transported in a picnic
box, as plankton is very sensitive to temperature changes. Fill the box with
a few liters of water from the first sampling point to keep the contents at
a constant temperature.
To study plankton you only need object slides, coverslips and dropper pipettes,
because plankton should be examined alive. After some hours the sample is mixed
with formaldehyde in order to preserve it (1 ml formalin 40% pure per 10 ml
sample volume. One small crystal of copper acetate may be added to stabilise
chlorophyll). All organisms with a hard cuticle (algae, rotifers and some other
planktic organisms) will be preserved properly, but there is no satisfactory
method of preservation for all planktic organisms. It is advisable to add a
few drops of glycerol, because in case of desiccation there remains a small
quantity of glycerol, which can be easily diluted with water again. Without
glycerol a dried plankton sample is beyond saving.
All the equipment mentioned above is sold in shops for school supplies.
There is such an abundance of species in freshwater and marine plankton that
the beginner must be content with a general classification of them. The introductory
books given here may be helpful even for those people who do not speak German:
| DAS LEBEN IM WASSERTROPFEN | ISBN 3-440-04000-3 | |
| MARINES PHYTOPLANKTON | ISBN 3-13-503901-3 | |
| DAS GROSSE KOSMOS-BUCH DER MIKROSKOPIE | ISBN 3-440-08989-4 |
Which microscope?
If you are not sure whether microscopy is a suitable hobby or not, you should at first use a cheap school microscope. There must be a built-in lighting system with a dimmer and - for your convenience - an inclined eyetube (both features are standard today!). In addition you should posses a mechanical stage. For the purpose of mounting a digital camera you should buy an additional non-inclined tube.
Should you want to use the microscope many hours a day, this should not become a stressful occupation. It is not of much importance to use objectives of high performance, it is enough to work with widefield eyepieces and an inclined binocular eyetube - better yet is the use of a more expensive trinocular eyetube so that a camera is always at hand. Many digital cameras have a "TV-mode", therefore they can be used as simple TV-cameras and the whole family can see the objects on TV. The controls of the mechanical stage should point downwards.
We recommend widefield eyepieces
12x or 15x. If you are farsighted, special eyepieces are preferable, so that
you need not remove your glasses when looking through the microscope. If you
are short-sighted such eyepieces are inconvenient because you might want to
do some other kind of work without wearing your glasses, and in this case you
would have to put them on again each time you want to look through the microscope.
If you suffer from astigmatism, this must be corrected by spectacles. Therefore
the use of eyepieces is obligatory.
Achromates 5x, 20x, 40x and 60x are favourable objectives. Most often the magnifications of 20x and 40x are needed. A 100x oil immersion objective will hardly ever be used, also you should not bother to acquire extremely expensive high-performance objectives (e.g. apochromates), because they are only of advantage in combination with adequately prepared objects - used by amateurs their low depth of field is even a disadvantage. It is crucial that the images are sharp even at the rim of the field and that they show no bulge. A field curvature is immediately apparent when a prepared object slide is moved. If there is a bulge you will feel "sea sick" after a while.
The condenser must correspond to the objectives used. Its numerical aperture (NA) must be identical with the maximum NA of the objective set, otherwise high numerical apertures are restricted by the condenser. The front lens should be removable to reduce the numerical aperture when low-magnification objectives are used. The vertical position of the condenser must be adjustable by a gear drive. There should be the possibility of centring the condenser with the help of small controls.
We strongly recommend a mechanical stage with the controls pointing downwards in order to prevent stress when working for many hours.
The attached picture of a microscope illustrates these features.
This raises the question of what brand should be chosen in case a more expensive device is to be bought. Microscopes sold by shops for school supplies are often manufactured in the Far East and then are given fancy brand names - nevertheless they are of pretty good value for the money paid. However, it is questionable whether you can refit such microscopes after five or ten years with a phase-contrast device, for example. With branded microscopes (Zeiss, Leitz, Olympus, to name a few) this will certainly be possible, but brand appliances are expensive! But may be you can find a good bargain at ebay.
Here are two more hints:
1. Make sure that the front lens
of the objective is accessible (see graph
A) and not hidden (graph B,
cheaper design) - otherwise soiling of the front lens is very difficult to remove!
2. The focus controls of cheap microscopes,
although nicely designed, are often inadequately fixed! To check this, try to
turn corresponding controls on both sides vigorously into different directions.
If poorly designed, the controls will loosen. When properly fixed, such a rotation
has no consequences!
A few words about magnification
Unfortunately beginners often use
a microscope as a device to magnify
objects as much as possible - therefore bacteria
are particularly popular among beginners. However, it is the resolution of the
optics that matters, not the magnification. The resolution d is the minimum
distance allowed between two points for them to be seen separately under a microscope.
Here the simplified formula:
| Resolution = Wave length / Numerical aperture | d = lmd / NA |
Accepting a wave length of lmd = 0.55 um (green light) and numerical apertures of 0.1 (low-magnification objective) and 1.3 (high-magnification objective), we get a resolution of 5.5 um and 0.4 um respectively. Finer structures are not resolved, they appear homogeneous even at a maximum allowed magnification. At the same time the NA value defines the maximum reasonable magnification which is accessible with the respective objective - it is 1000 x NA. When using a low-magnification objective (NA = 0.1) the maximum total magnification is 100x, with an oil immersion objective (NA = 1.3) the maximum magnification is limited to 1300x. If you go beyond the respective limits using eyepieces of high magnification, this results in void magnification: The image is blown up without showing more details. If objectives of low magnification are used, this has no consequences, but if objectives of high-magnification are used, the quality and the contrast of the image decreases drastically.
Strictly speaking the formula is d = f. lmd / NA. See the attached graphic. Putting f = 1 results in the simplified formula shown above; usually f is set to 0.6.
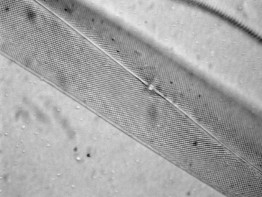
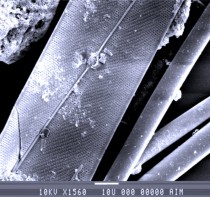
Unfortunately, the "Abbe's formula" is often misinterpreted even by professionals. One must distinguish between "maximum resolution", "structural resolution" and "image resolution"! Let us imagine two fine grids of round or square elements, the elements being 0.4 um apart. At a higher magnification (NA = 1.33) two different structures can be discriminated, but it is impossible to make reliable statements about the shape of the grid elements - the microscope delivers just two different "equivalent images". The next two images show this very clearly: The left picture displays the frustule of a diatom (Gyrosima sp.). The microscopic image "clearly" reveals a perpendicular intersecting system of lines, the right picture shows the same diatom at a similar magnification, this image being obtained by a scanning electron microscope (SEM). Now we see a structure of regularly arranged circular pores, because the resolution of the SEM is much higher!
|
|
Therefore, never forget that "Abbe's formula" gives the maximum resolution. To analyse a structure the structure must be at least 5-times larger. In consequence, only structures of 2 um minimum, or, even better 5um, provide realistic images and thus can be analysed (structural resolution). A "picture" consists of several "structures", the "image resolution" thus covers the range from 10 um up to 50 um. Now we can understand why bacteria (diameter about 1 um) are objects unsuitable for amateurs: When trying to examine them you are beyond "structure resolution" and far beyond "image resolution"!
"Equivalent images" are nowadays still useful for the identification of species, so specialists investigate their objects with maximum resolution. But amateurs, and especially beginners, wish to interpret microscopic images. Therefore it is advisable that they deal with objects whose diameters are not smaller than 10 um.
The
condenser, an enigmatic entity ...
There is no more mischief
caused by any other part of the microscope than by the condenser - it could
be well dubbed as "image degradating device", although, when used
in the right way,the condenser increases the image quality substantially. The
operation of the condenser is shown in the following graph.
The green lines mark the aperture angle of the objective, so NA = n x 2sin
(a) (in case of air n = 1). The smaller this angle, the lower is the numerical
aperture NA, hence the resolution of the objective. The condenser guarantees
that the aperture angle of the objective is actually used, and this is only
the case when the upper lens of the condenser is close to the object and the
diaphragm of the condenser is open ("aperture diaphragm"). By lowering
the condenser or closing the diaphragm the effective aperture of the condenser
is reduced and accordingly the resolution of the objective.
Here is a rule of thumb for beginners:
Adjust the condenser in a top
position and open the diaphragm at least half-ways. In particular, never weaken
bright light by closing the diaphragm! Use grey filters or a dimmer instead
(today this is standard - even in inexpensive microscopes)!
In practice the diaphragm should be half-open to avoid glare and to increase the depth of field. In addition the effective aperture of the condenser should not exceed the aperture of the objective. In this case the front lens must be removed or turned away.
It is very instructive to investigate a finely structured object, such as a diatom, at a high magnification. When closing the diaphragm the image appears increasingly more contrasted and sharper, but only coarser structures become more distinct, while finer structures become blurred or even disappear completely.
In fact the rules given above can not be applied in case of high-magnification objectives, because the higher the NA-value, the smaller is the depth of field and so layers out of focus blur the image increasingly. To take these "troublemakers on board" we have no other choice than closing the diaphragm (see graph). But this has a very negative impact on the quality of the images: In the case of an objective with a NA of 0.3 the allowed maximum magnification is 300x. When using an objective of 20x and an eyepiece of 15x, the resulting magnification is 300x and stays within the allowed range. If a 60x objective is used instead and the effective NA is reduced to 0.3, the allowed magnification is still 300x, but the void magnification is now 60 x 15 = 900x! In the case of low-magnification objectives this is no problem, but in the case of high-magnification objectives the image quality decreases considerably! All this leads to the following rule, which is unfortunately often neglected even by professionals:
If you have to work with a closed diaphragm, the chosen objective is inadequate and you must either choose an objective with lower magnification (lower NA) or use a much thinner section!
We now understand why 60x objectives can be used with profit only in rare cases, and this applies a fortiori to 100x immersion oil objectives!
There is another diaphragm integrated in the foot of high-quality microscopes, the "light field diaphragm". Proceed as follows: Open both diaphragms and focus on the object, close the light field diaphragm and lower the condenser until the edges of the field diaphragm appear in focus, too. Now open the light field diaphragm to an extent that the edges just disappear. What was said above is also valid for the diaphragm of the condenser. The light field diaphragm does not serve to dim the light! It is used to suppress unwanted reflections and glare, thus improving the brightness of the lighting system indirectly, which is important in photomicrography. Since the method described here can only be achieved with a well-centred condenser, such a device is of great advantage.
Labelling
of objectives
We usually find the following information
on any objectives:
1. Manufacturer
2. Type (Achromate, Planachromate,
Apochromate, Neofluar, Fluorite, etc.)
Achromates are red-blue corrected.
This is a compromise to suppress colour fringing. This type is sufficient for
beginners.
Planachromates additionally
possess an even field sharp to the rim - this is of great advantage when the
microscope is used for many hours or when photos are to be taken.
Apochromates have been corrected
for all colours and accordingly they are very expensive. Such objectives show
their quality only when suitable objects are investigated at high resolution
- they are therefore a useless acquisition for beginners.
3. NA (numerical aperture).
It indirectly provides the maximum resolution and the maximum magnification (see above).
4. Magnification (e.g. 20x).
The total magnification TM is calculated from the objectiv magnification OM and the eyepiece magnification EM (see graph). Keep in mind that TM should be kept constant even when the condenser diaphragm is closed and the maximum reasonable magnification MM is decreased (this will lead to the deterioration of image quality).
Ideally: TM = OM x EM < MM = 1000 x NA
In the case of low-magnification objectives operating beyond the maximum magnification MM is no problem, but in the case of high-magnification objectives, the quality of images decreases considerably.
5. Tube length (160 mm, 170 mm,
oo)
Objective and tube length must correspond (usually 170 mm, 160 mm in case of
ZEISS, now very often "infinite" oo). If all parts of the microscope
are of the same brand there is no problem about the length of the tube, but
when combining components of different manufacturers one must pay attention
to the length of the tube! This is particularly true for high-resolution objectives
- a "bargain" at eBay, used in the wrong microscope, may turn out
to be very disappointing! Beginners should abstain from combining optics produced
by different manufacturers. The results may appear suitable, however for a beginner
it is not possible to detect the loss of quality because of his lack of experience
and the lack of comparable objectives.
Objectives that are designed to "infinite" (oo) can not be transfered to microscopes of different brand!
6. Thickness of the coverslip
(e.g. / 0.17 mm)
Often the optimal thickness of coverslips is indicated. Its thickness is an
important parameter when the optical system is designed, so the coverslide is
part of the optical system!
7. ... and what is not said on
the objective ...
Objectives consist of several lenses, each lens surface reflecting a small portion
of light. This light "roams" within the system and lowers contrast
and brilliance of colours. To avoid this all lenses are coated with a thin anti-reflection
layer and special putty is used to connect lenses. So two identical systems
(the same magnification, the same NA) may differ significantly in image quality!
When buying a microscope test it in the shop using a brilliantly stained prepared
slide and compare the no-name microscope with a microscope of a well known brand!
Sometimes it is best to combine a no-name microscope with optics from a good
brand.
At
last some practical hints
Always use coverslips! Coverslips do not only protect the front lenses of the
objectives, they are indeed part of the optical system (see above).
But even when handling the microscope carefully, front lenses may be contaminated.
Remove the objectives from time to time and hold them in such a way that a light
source is reflected in the front lenses. Contamination can then easily be detected.
Remove them with water and blotting paper or tissue. Fat is removed with benzine.
Alcohol and acetone must not be used because they may penetrate into the system,
thus corroding the putty. Poor image quality is often caused by polluted front
lenses, but unfortunately the decrease of quality and contrast is a slow process
which is not noticed by inexperienced beginners.
When using
a microscope it is important to always have both hands on the controls: With
one hand you turn the fine focus control, with the other one you vary the aperture
of the condenser diaphragm or move the mechanical stage, so it is important
that the controls of this device are facing downwards. These hand movements
show the trained microscopist - someone who only "looks into the tube"
with his hands in his lap still needs to practice a lot!
Finally one more good piece of advice: In the UK there are many groups specialised on microscopy - these groups are always open to guests, beginners and advanced amateurs. You will easily find them by looking for them on the Internet! (Some of them you can find on our page <links>)
Copyright: webmaster@mikrohamburg.de